Showing posts with label how to. Show all posts

Friday, November 15, 2013

Check OpenGL version supported on your system - OpenGL Extensions Viewer

OpenGL Extensions Viewer is a software which displays useful information about the current OpenGL 3D accelerator. It available for Windows 32bit and 64bit and MacOS X, iOS, and Android.

This program displays the vendor name, the version implemented, the renderer name and the extensions of the current OpenGL 3D accelerator.

Visit: http://www.realtech-vr.com/glview/

OpenGL Extensions Viewer

Saturday, November 2, 2013

How to Find on this page in IE11

To find words in current loaded page in Internet Explorer (currently IE 11), you can press Ctrl+F, or click "Find in this page" in Edit option of Menu bar.


If you can't see the Menu Bar in IE, you can enable it by right clicking on IE's top area, and check to enable Menu bar.

Tuesday, October 29, 2013

Capture screen of Windows 8.1 with Snipping Tool

To capture your Windows 8.1 screen, add notes, save the snip, or email, you can use Windows 8.1's Snipping Tool.

Enter Snipping Tool in the search box, and then tapping or clicking Snipping Tool.


Official Windwos Help: Use Snipping Tool to capture screenshots

Sunday, October 20, 2013

Visual Studio 2013 Web Editor Features - HTML Editor

Visual Studio 2013 Web Editor Features - HTML Editor
The video shows Visual Studio 2013 HTML editor features, including full IntelliSense for HTML elements, all CSS classes and ID's in your project, HTML entities, rich snippets, drag and drop for media, support for modern libraries like AngularJS, KnockoutJS and Handlebars, and a variety of meta tags.

Tuesday, January 22, 2013

Windows 8 tutorials


windows8update.com have put together a complete overview of all the different parts and functions of Windows 8 - Windows 8 Tutorials.


  • Windows 8 Upgrade Tutorial: You might be interested in articles about upgrading from Windows XP, Windows Vista or Windows 7 to Windows 8. Check out our Windows 8 Upgrade guide or Tutorial.
  • Introduction to the Windows 8 interfaceMicrosoft have totally re-imagined Windows. The new user interface is different from anything you have ever seen in a Windows Operating System. Learn about Metro, Charms, Hot Corners and more.
  • The Windows 8 Charms BarThis section covers the Windows 8 Charms section of Windows 8. This is a new feature in Windows 8 that allows users to get to some of the most commonly used functions in the Operating System quickly.
  • Windows 8 PC SettingsThis section covers the Windows 8 PC Settings section of Windows 8. This is the section that allows you to tweak your PC configuration.
  • Windows 8 FAQ’sThis section covers the Frequently Asked Questions (FAQ’s) about setting up some of the core apps in Windows 8.
  • Windows 8 ApplicationsThis section covers the applications that actually come with Windows 8 such as the Windows 8 Messaging application, the camera application, the music applications etc.
  • Windows 8 Control Panel: This section covers the parts of Windows 8 that users can configure when they need to make changes to the way Windows 8 runs. These include items like Windows Update, Location Settings, Family safety and Autoplay.
  • Windows 8 Administrative ToolsThis section covers the parts of Windows 8 that System Administrators need to use to monitor and configure the system such as Computer Management and Windows Firewalls.

  • Saturday, September 22, 2012

    Setup Controls using C# code, instead of XAML.

    In this exercise, we are going to add TextBlock using C# code, instead of XAML.

    Start Visual Studio Express 2012 RC for Windows 8, New Project..., using template of Visual C# Windows Metro styles, Blank App (XAML), with name of helloMetro_Csharp. OK.

    New Project..., using template of Visual C# Windows Metro styles, Blank App (XAML), with name of helloMetro_Csharp.


    Double click on MainPage.xaml in Solution Explorer to open the XAML defination of the screen. Modify the code to add x:Name="mycontent" for <Grid> element. And save it.

    Modify XAML to add x:Name


        <Grid x:Name="mycontent"
            Background="{StaticResource ApplicationPageBackgroundThemeBrush}">
    
        </Grid>


    Double click on MainPage.xaml.cs to edit the code behind MainPage.

    Modify the code behind MainPage


            public MainPage()
            {
                this.InitializeComponent();
    
                TextBlock myTextBlock = new TextBlock();
                myTextBlock.Text = "Hello Dev-MicroSoft";
                myTextBlock.FontFamily = new FontFamily("Times New Roman");
                myTextBlock.FontSize = 80;
                myTextBlock.HorizontalAlignment = HorizontalAlignment.Center;
                myTextBlock.VerticalAlignment = VerticalAlignment.Center;
    
                mycontent.Children.Add(myTextBlock);
    
            }


    Save and Run it.

    Hello Dev-MicroSoft


    Tuesday, June 19, 2012

    Create bootable USB Windows 8 Release Preview

    To craete bootable USB Windows 8 Release Preview from Windows 7 PC, you need to download and install Windows 7 USB/DVD download tool.

    Download Windows 8 Release Preview ISO images.

    - With a USB inserted.

    - Windows 7 USB/DVD download tool.

    - Browse to choose downloaded Windows 8 ISO file.


    - Choose media type of USB device.


    - Select inserted USB and click Begin copying.


    - Bootable USB device created successfully.


    Wednesday, June 6, 2012

    winlogon error on Windows 8 Release Preview

    I have updated Windows 8 from Consumer Preview to Release Preview. When I shutdown the Windows I get a message as "winlogon.exe - No Disk"!

    winlogon error on Windows 8 Release Preview


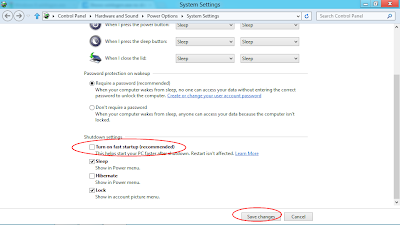
    Solution is to turn off fast startup.

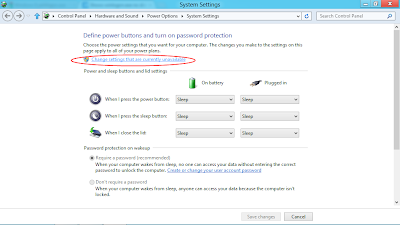
    - Search "Shutdown Settings" from Settings, and click to run "Change what the power buttons do".


    - "Change settings that are not currently available".

    Change settings that are not currently available

    - Scroll-down and uncheck "Turn on fast startup (recommended)" and Save changes.

    Turn off fast startup (recommended)


    Saturday, June 2, 2012

    Hello Visual Studio Express 2012 RC for Windows 8

    As common practice, click New Project... on starting page of Visual Studio Express 2012 RC for Windows 8.


    Select template of Visual C++ Windows Metro style, Blank App (XAML), with name of HelloMetroCpp. And click OK.


    Double click on MainPage.xaml in Solution Explorer to open it.


    - Manual edit XAML to show something. Insert the code in-between <Grid></Grid>

            <TextBlock 
                Text="Hello Visual Studio Express 2012 RC for Windows 8"
                FontFamily="Times New Roman"
                FontSize="30"
                Foreground="White"
                HorizontalAlignment="Center"
                VerticalAlignment="Center"/>


    Save, Build and Run it.


    To close the test app, you can switch back to Visual Studio Express IDE by Alt-Tab keys, then click the icon to stop debugging.

    Or, drag on top of the hello app, move to bottom on screen to close it.

    Friday, May 25, 2012

    Create Metro style application using Javascript


    - Click New Project... in Visual Studio 11 Express Beta

    - Select Javascript Windows Metro Style template, for Navigation Application, enter name and location, and click OK.


    - The default code will be generated for you.


    - Run to see what it look, press F5 to build, deploy, and launch the app.


    Now we can try to modify something on the Welcome page.
    -  Expand html folder our project name, HelloJSMetro, double click to open homePage.html. You can see, it's the html code of or welcome page.


    - Modify something:

            <section aria-label="Main content" role="main">
                <p><h2><a href="http://dev-microsoft.blogspot.com/">Dev-Microsoft.blogspot.com</a></h2></p>
            </section>


    - It's simple html code, click the link to open my blog ("http://dev-microsoft.blogspot.com/") in Metro IE.


    Saturday, May 12, 2012

    Know how to use mouse and keyboard on Windows 8

    This video is created by Microsoft Windows 8 Consumer Preview. For more information, visit: http://windows.microsoft.com/en-US/windows-8/get-started

    How to close Metro Style Application in Windows 8

    There are no close/exit icon on Metro style application. To close it manually, Touch and Drag from the top of the screen to the bottom.


    Run Metro style applications on Simulator


    Metro style apps are full-screen and respond to user touch and hardware events like screen rotations. The Visual Studio 11 Beta simulator for Metro style apps is a desktop application that simulates a Windows Metro style app. It enables a developer on a single machine to run Metro style applications and simulate common touch and rotation events. You can also choose the physical screen size and resolution that you want to emulate. Location co-ordinates of user input events in the simulator are translated to the co-ordinates of the select size and resolution.

    Together with Visual Studio, the simulator provides an environment in which you can design, develop, debug, and test Metro style apps. However, before you publish your app to the Windows Store, you should test your app on an actual device.

    *Also apply on on Visual Studio 11 Express Beta for Windows 8


    - To enable Simulator, simple select Simulator as the target debug device.


    Read more: Microsoft Windows Simulator Touch Emulation


    Saturday, April 28, 2012

    Hello Metro application using C++, with Button click event handler.

    Continuous work from the last post "Create Metro style Hello World in C++ using Microsoft Visual Studio 11 Express for Windows 8 Beta".

    - Add a button
    With BlankPage.xaml opened. Drag a Button from ToolBox on the Design Panel, place anywhere you want.
    With the Button selected, edit in Properties panel to change its Name to "myButton", and change Content under Common to "Click Me".
    It can be noticed that <Button> in BlankPage.xaml will be updated accordingly.

    - Name the TextBlock
    With the TextBlock selected, edit in Properties panel to change its Name to "myText".

    - Insert Button click event handler
    Double click on the Button in Design panel. It will insert Button click event handler, helloMetroC::BlankPage::myButton_Click(), in BlankPage.xaml.cpp automatically.

    And Click="myButton_Click" will be added in <Button> in BlankPage.xaml.
        <Grid Background="{StaticResource ApplicationPageBackgroundBrush}">
            <TextBlock x:Name="myText" HorizontalAlignment="Center" VerticalAlignment="Center" FontSize="50" Text="Hello Metro" />
            <Button x:Name="myButton" Content="Click Me" HorizontalAlignment="Left" Margin="552,519,0,0" VerticalAlignment="Top" Width="263" Click="myButton_Click"/>
    
        </Grid>
    

    - Add code in Button click event handler 
    Switch to BlankPage.xaml.cpp, and insert the code in the function helloMetroC::BlankPage::myButton_Click().
    void helloMetroC::BlankPage::myButton_Click(Platform::Object^ sender, Windows::UI::Xaml::RoutedEventArgs^ e)
    {
     myText->Text = "Thanks";
    }


    - Build and Run
    When the application running, click on the Button will make the TextBlock change. That's.


    Friday, April 27, 2012

    Create Metro style Hello World in C++ using Microsoft Visual Studio 11 Express for Windows 8 Beta

    - New a Project in Microsoft Visual Studio 11 Express for Windows 8 Beta, using template of Visual C++, Windows Metro style, Blank Application, name it helloMetroC.

    - The wizard will generate a dummy application for you.

    - Double click on the BlankPage.xaml from the Solution Explorer, to start edit it.

    - Click TOOLBOX on the left side border, to expend the Toolbox panel. Click to expend Common XAML Controls, drag a TextBlock on the Design Pane.

    - Now, you can see a TextBlock in the design view, and a new element of <TextBlock> in XAML view.


    - We can edit the XAML directly.
    Modify the content of <TextBlock> element like it:
        <Grid Background="{StaticResource ApplicationPageBackgroundBrush}">
            <TextBlock HorizontalAlignment="Center" VerticalAlignment="Center" FontSize="50" Text="Hello Metro" />
    
        </Grid>


    - Select Save All from File menu, to save the solution.

    - To build the solution, Build Solution from Build menu (or press F7).

    - Run it by clicking on the Play button, or Start Debugging from Debug menu, or press F5 directly.


    Next:
    - Hello Metro application using C++, with Button click event handler.

    Tuesday, April 24, 2012

    Create Metro style app in Visual Studio 11 Express Beta for Windows 8

    Now you can develop Metro style application on Visual Studio 11 Express Beta for Windows 8.

    Test platform
    • A low grade Netbook, BenQ Joybook Lite U101.
    • CPU: Atom N270 1.6 GHz.
    • External Monitor!
    • OS: Windows 8 Consumer Preview.
    • IDE: Visual Studio 11 Express Beta for Windows 8.

    - Install and start Visual Studio 11 Express Beta for Windows 8, on machine with display resolution higher than 1024 x 768.

    - Click New Project...

    - Select Template of Visual Basic - Windows Metro style, Grid Application, name your project (ex. testMetro), and click OK.

    - Visual Studio 11 Express Beta will generate a dummy Metro style application, now you can click the Run button to start it.

    - The generate Metro style application.
    Metro style application

    ! Please note that in order to develop Metro style application, you MUST have a monitor with resolution higher than 1024 x 768.
    you MUST have a monitor with resolution higher than 1024 x 768